Sunday, November 29, 2009

Fashion Show And Tell: Kathy Van Zeeland Bag (and a little bit about black friday shopping)

Hey loves!

I hope you all had a nice and memorable Thanksgiving! I had a great time, and I am totally stuffed! As everybody knows, it was a black friday weekend and there were so many people shopping...it was so crazy!

I didn't buy much on Black Friday just a few things here and there.

I stopped by MACY'S because they were having buy one sweater and get one free, so I got 2 sweater dresses. And then I went to Forever 21 and got a pair of leggings which were $5.00 and a scarf for $7.00. I went to Old Navy and got 2 sweaters because they were $15.00 each and all jeans were $15.00-pretty good deal huh?

As for online Black Friday shopping I just took advantage of some last minute news I read online-on Zoya.com if you make a $20 purchase you get 6 green nail polishes for free! So, I jumped on that right away because that offer did not last long at all! I can't wait to show you all the swatches when I get it in the mail. I can't wait to do some nail of the day with the polishes too.
I also ordered (finally) the coastal scents 88 piece eyeshadow palette! I cant wait to get that in the mail as well and show you all some looks that I come up with it.

I wanted to show you all this Fab bag that I got in Burlington Coat Factory. It is by Kathy Van Zeeland and it was only $50 (originally $99). I love this bag. It is so cute, and spacious and great for traveling with on the weekends. I love that it is a dark navy color as well, as I don't own any navy bags.

Here are some pictures, Enjoy!


Love this bag! I especially love the quilted feel of it


Cute Crown Zipper Handle :)


Inside Of The Bag-Love all the pocket compartments


I hope you all enjoyed and Thanks for stopping by! Did any of you get anything for Black Friday? Let me know in the comments section!


Disclosure: I purchased this bag in Burlington Coat Factory with my own cash money.

Thursday, November 26, 2009

Happy Thanksgiving!

Align Center


I hope you all have a safe, and happy Thanksgiving!

Beauty Crave: Haircare Editon

Hey Beauties!

Here is another installment of Beauty Crave. Except this time I am featuring hair products that I want to get my hands on!

Lets get started shall we?


I am dying for this treatment! I always see youtube videos of people raving mad about this oil. The Moroccan Oil is good for hair that is dry and damaged (like mine is-boo!). It provides hair with shine, it eliminates frizz, and protects hair from environmental pollutants among many other benefits. Best of all, this oil does not contain animal ingredients and is not tested on animals! Yippee!


Ahh Yes! The famous CHI Silk Infusion. I can't believe I don't have this yet. This product is great for applying to damp hair before blow drying and flat ironing. It does not contain alcohol and it's great for making the hair soft.


I am really curious to know how this clipless curling iron works. I am sure it will give my hair beautiful curls. My hair is a bit hard to curl unfortunately. I curl my hair with a curling iron and I spray away like crazy to make sure it will hold all day. But it is no use, my hair falls limp quite quickly. Maybe this iron will help my curls hold better. One day I shall try this and see. This iron is 100% ceramic, heats up to 320 degrees, and comes with a heat resistant glove.


This hair serum looks like it could do wonders for my super frizzy hair. It is interesting too because this serum is activated to provide shine when you apply heat to it. It also doesn't hurt that it smells like cherries! Yum!

Have any of you tried any of these products mentioned above? Let me know in the comments section loves!


Image Credits:
Pictures 1 and 2-Folica.com
Pictures 3 and 4-Beautychoice.com
I am not advertising for any of these websites or affiliated with them.

Wednesday, November 25, 2009

E.L.F. Hollywood Eyelash Kit: My Quest with Learning How to Apply False Lashes! And a Review


When I found out that E.L.F. arrived at my local Target store, I knew I had to check out the display. To my dismay, there was not much variety to choose from. I noticed there were a lot of E.L.F. makeup kits. See, I am not one to wear false eyelashes...I always thought that my eyelashes were pretty nice. They were long and thick. But most importantly, I have always been afraid to tamper with false eyelashes. I don't know what it is but there is something intimidating to me about false eyelashes. They look fab on! But I have come to realize that the application process is one that needs to be practiced before it can be done right.

I saw the E.L.F. Hollywood Eyelash kit ($3.00) and I caved in and bought it. I thought they looked so thick, and glam. I was willing to get these babies to work for me.

The E.L.F. Hollywood Eyelash Kit contains 1 pair of false lashes, eyelash glue, lash applicator, and a lash stand. Good deal for $3.00 eh?

I tried putting these babies on the first time knowing that it was ok if I did not get it right because lashes can be stored away for use again. I tried putting them on the first time and it did not work out at all! I made a huge mess.

I tried a second time, and although it does not look perfect I think it looked quite better. I think what helped me was that I cut the end of the lash strip a bit because I realized they were quite too long. And I also used the help of some tweezers when it came to sticking the lashes to my outer and inner corners of the eye lids. That helped a whole lot!

Here are pictures of the lashes on me. Please don't hold my crappy false lash application against me-I will keep on practicing until I get it right! Practice makes perfect right? But if I do say so myself, the lashes do make quite a statement. They can change your whole look dramatically.


E.L.F. lashes-aren't they glam?


I think you can see the eyelash band here! Oops!


Now, let's get to talking about the kit itself.

Here are pictures of the Kit:


E.L.F. Hollywood Eyelash Kit


Lash Applicator

Pros:
1. Great starter kit for those who are looking to experiment with false lashes

2. The eyelash glue is surprisingly good. It gets tacky and makes for a nice lash application. But I have heard that DUO eyelash glue is quite good, so I may look out for that one.


3. The price is great!


Cons:

1. I find the lash stand and the lash applicator useless. It was quite hard to apply the lashes using the E.L.F. lash applicator because it is so big! I would rather use plain good ol' tweezers, as they are much easier to use and they allow you to move the lashes around more comfortably.


2. Lashes feel a little heavy on me. I don't know if it was that my application was off, but they felt like they weighed a ton on my eyes!

Overall, nice kit to play around with. But I am sure there are much better lashes out there.

Have any of you tried this lash kit? Love it hate it? Any tips for me when it comes to applying lashes? Let me know in the comments section loves!


Disclosure: I purchased this eyelash kit at my local Target store with my own money.

Look Of The Day: Thanksgiving Look!

Hey Sugar Plums!

Here is another look of the day. This look would be amazing to wear for a Thanksgiving party, or a nice family Thanksgiving get-together. When I think of Thanksgiving, I envision colors such as golds, bronzes, and yellows. This look is really neutral-very simple and easy to do!

I hope you all enjoy this look and here are some picture. Products used are listed below.


With Flash


Without Flash

Eyes:
1. UDPP on lids as a base
2. Make Up For Ever eyeshadow #2 blended in the inner corners (matte yellow)
3. Urban Decay eyeshadow in Maui Wowie (Ammo palette) on top of the MUFE
eyeshadow and blend
4. Urban Decay eyeshadow in Smog on the outer V and blend
5. Apply Smog on the lower lashline
6. NYX eyeshadow in Highlight on the browbone
7. Urban Decay 24/7 glide on eye pencil in Zero applied to the waterline
8. Stila Smudge pot in black applied to the upper lids, wing out
9. Apply Mascara (I forgot to apply it for this look, oops!)

Face:
1. American Beauty Ultimate Diamond Luminous Mineral Makeup SPF 15 in Light-
Medium
2. Bare Minerals foundation in Light
3. MAC Studio Finish Concealer in NW30
4. L.A. Colors Mineral Blush in Just Peachy
5. E.L.F. Wet Gloss Lash and brow mascara to set eyebrows
6. Bare Minerals Face Color in Faux Tan to contour cheeks

Lips:
1. E.L.F. Luscious Liquid Lipstick in Pink Kiss

Do you guys have any thanksgiving looks planned? Let me know!

Look Of The Day: Smokey Purples with Hot Pink Lips!

Hey dolls!

Here is my latest look of the day. It is comprised of a smokey purple eye with my *always dependable*-or so I like to think, hot pink lips.

Here are pictures of the look and products used listed below. Enjoy loves!


Eyes:
1. UDPP as a base on the eye lids
2. Stila smudge pot in Violet as another base for the purple shadow spread all over the lids
3. Urban Decay's eyeshadow in Fishnet applied to the inner corners and blended
4. Make Up For Ever eyeshadow #92 applied on the outer V and blended out
5. Urban Decay eyeshadow in Zero applied to the outer crease and blended
6. Stila Smudge Pot in Starry Night applied to the upper lash line and wing out a bit
7. urban Decay pencil eyeliner in Zero applied to the waterline and apply urban Decay
eyeshadow in Zero on top to set it.
8. L'oreal Extra Volume Collage Mascara in Brown Black to upper and lower lashes
9. A bit of Urban Decay eyeshadow in Honey applied to the inner corners

Face:
1. Bare Minerals SPF 15 Foundation in Light
2. MAC Hello Kitty Blush in Fun and Games
3. Bare Escentuals Faux Tan all over face color used to contour cheeks

Lips:
1. Jordana Lip Pencil in Baby Dreams applied all over lips as a base for lipstick
2. MAC Girl About Town lipstick

By the way, what are you all doing for thanksgiving? I am going to spend it with the hub and his family-I love them all because they are like a second family to me :) I am very thankful for so many things in my life. I have my beautiful parents in my life, my hub, my dogs and a whole lot of love around me. And who can forget YOU ALL! I am thankful for all of my beautiful readers, whom take the time out of their day to check whats going on in my side of the woods. I appreciate and thank you all! You are the reasons I keep on writing this blog, Muazzzz!!! What better gift than that right?

Sunday, November 22, 2009

Product Review: Stila Smudge Pot Collection

Photobucket
Stila Smudge Pot Collection


Stila always seems to amaze me with their adorable makeup sets at such affordable prices. I introduce to you all the new limited edition Stila Smudge Pot Collection ($32.00). If you are not familiar with Stila smudge pots, they are gel eyeliners that double as an eyeshadow/base. I have been using Stila smudge pot in black forever! And I can honestly say that it is my HG eyeliner. I actually prefer to use it over liquid eyeliners. I love the ease of application I get when using gel eyeliners and for me, it lasts a pretty good while on me.

I decided to purchase this set because, I was very curious in trying other smudge pot colors as I have only used the black shade. And can we say affordable! just $32.00 to try 4 colors. The sizes are quite small at .07oz-but please believe me that this stuff will last you forever as you only need a tiny bit to achieve a nice, smooth even application.

The Stila Smudge Pot Collection includes a mini eyeliner brush and 4 smudge pot shades:

1. Kitten-A shimmery nude champagne
2. Violet- A shimmery purple
3. Starry Night- A shimmery dark navy
4. Black- A creamy dark black

Swatches:

Photobucket
Left to Right: Kitten, Violet, Starry Night, Black With Flash

Photobucket
Without Flash


Here are pictures of the smudge pots taken in broad daylight, and below each of the pictures are my initial thoughts of the color.

Photobucket

Kitten is a really pretty nude champagne color that would look fab as an allover eyeshadow or as a base for gold shadows, olives, and bronze. I don't think this would be good as an eyeliner color because it barely shows, so definitely good for a base.

Photobucket

Violet is very beautiful in the jar, but when I tried this color on my lids as a liner, it barely showed up! I had to apply many coats just to make it look descent. I think it's just my reaction because I have super oily eyelids-Yes, I am talking grease fest! But overall, I do like it and I do intend to experiment more with it to see how I can make it work. Who knows, maybe it will work great as a base for purple eye shadows.

Photobucket

Starry Night is described as a navy with shimmer, but it looks more purple-ish to me. Overall, really pretty color that works great as a liner. It helps give the eyes a pop of shimmery dark color. It is a nice change from the traditional black eyeliner.

Photobucket

Black is my HG eyeliner! Can't go wrong with a basic, creamy, dark black that works great as a liner and a base. Love it!

Pros:
1. Long Lasting Colors
2. Nice Variety to play with and create looks with
3. All smudge pots look great as eyeshadow bases
4. Affordable
5. Easy to apply
6. The shimmer in the smudge pots are not overwhelming
7. Smudge pots last a long time because a little goes a long way
8. The packaging for this collection is 100% recyclable-Very Earth Friendly!

Cons:
1. Violet is a bit sheer as a liner, need a few coats to get color to show up (my experience)
2. Not fond of the smell
3. The mini-eyeliner brush included in this kit is useless to me because its too fluffy and loose. I
prefer to apply my gel eyeliner with a stiff small brush.

Overall, I do like this kit a lot and I am so happy I purchased it. This would make a lovely gift for your special makeup-holic friend. Affordable, and cute! Love!

You can find the Stila Smudge Pot Collection at Sephora stores, Sephora.com and stilacosmetics.com. And retails for $32.00. Have any of you tried Stila Smudge Pots? Love em? Hate em? Let me know in the comments section loves!


Disclosure: I purchased this gel eyeliner set at my local Sephora store with my money.

Friday, November 20, 2009

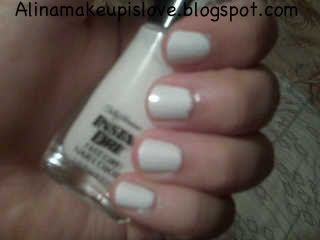
Nail Of The Day: Sally Hansen Insta-Dri in 'Whirlwind White' + Konad!

Hey Loves!

Here is my current nail of the day. Ok, I guess it is safe to say that I am becoming quite obsessed with Sally Hansen's Insta-Dri nail polishes. I feel like I gotta start a collection, ya' know?

The other day I realized that I did not own a nice crisp, white nail polish. Immedietley, I went to my local CVS store and knew I could rely on my trusty Sally Hansen Insta-Dri polish. Let me tell you, this color is amazing. I always hear that most white nail polishes can go on streaky, or they can require lots of coats in order to get that white opaque look. But not with this insta-dri polish, no way! I got a beautiful-streak free, no air bubbles, even opaque look with just one coat! I did 2 coats because of habit, but you can definitely get away with one coat of Sally Hansens Whirlwind White ($4.99).

Here is a picture of the white polish on my nails, and I decided to add a fun, retro konad image from plate m65. I am not too happy with how the designs came out, but its ok...looks cool. Practice makes perfect! Don't worry, I will get my Konad game up lol.

P.S. Sorry about the crappy quality of the first picture. My digital camera was away from home (let my nephew borrow it) and I attempted to get the best picture as I could with my blackberry camera. Enjoy Loves! And thanks for stopping by :)

Photobucket
Sally Hansen Insta-Dri Fast Dry nail color in 'Whirwind White'-2 coats


Photobucket
Konad Image from plate m65, used Konad Special Polish in black

Photobucket

Disclosure: I purchased this nail polish at my local CVS drugstore.

Product Rave: EOS Lip Balm in 'Summer Fruit'

Hey loves!

I hope all of you had a great week! Weekend here we come :)

I am so sorry I have not posted anything on my blog in a few days, I have just been really busy with school work and all. And by the time I get home it's pretty late and I am so exhausted. Stay tuned this weekend beause I have a lot of neat posts coming up!

I am sure you all have heard about EOS (the evolution of smooth) lip balms. I was always intrigued by them beceuase they were round! The packaging looks like a little colorful egg! lol...so cute! And so different than anything I have ever seen before. I read lots of raves about this fabulous product, and I couldn't resist getting my hands on it and taking it home with me.

I got the EOS lip balm in Summer Fruit ($3.29). It smells divine! It kind of smells like peaches. Love that! It has a twist off top which I like. The balm itself is shaped like a sphere, which makes for really easy (and interesting) application on the lips. This product also goes on clear on the lips.

The EOS lip balm really leave my lips feeling oh so smooth and not sticky. Gotta love that! I like that I don't get that lip balm residue on the lips after I reapply, which I tend to do every 30 minutes or so! I also love the fact that this lip balm is 95% Organic and 100% natural.

Sorry for the crappy pics-my digital camera is not in services right now, and I had to settle for my blackberry camera.

Photobucket
Look! It's a cute little pink egg!
Photobucket
EOS Lip Balm in Summer Fruit


Here are sme benefits of this fab EOS lip balm as stated on the packaging:

1. Petrolatum and paraben free
2. Contains antioxidant vitamin E
3. Contains Shea Butter
4. Contains Jojoba Oil
5. Certified organic by VOF
6. Not tested on animals

Nice stuff eh? I love this lip balm and I definitely reccomend you all try it. You can find EOS lip balms in Duane Reade, Pathmark, Walgreens, and Rite Aid.

Have any of you tried this lip balm? Love it? Hate it? Want to try it? Let me know in the comments section loves!


Disclosure: I purhased this lip balm at my local Pathmark store.

Saturday, November 14, 2009

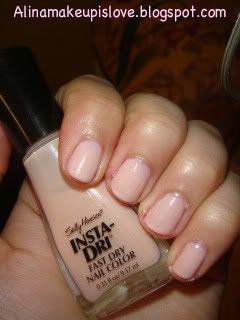
Nail Of The Day: Sally Hansen Insta-Dri Fast Dry Nail Color in Petal Pusher

Hey Loves,

Here is a pic of my nail of the day. It is another Insta-Dri polish from Sally Hansen in 04 Petal Pusher ($4.99). Petal pusher is a beautiful nude-light pink color.

Photobucket


I have always liked the application of Sally Hansen's Insta-Dri polishes and rarely had trouble with them, but this one gave me a headache! hahaha. Application went smoothly when I did 2 coats, but that was too sheer-as with most nude polishes. I decided to add 1 more coat, for a total of 3 coats and still too sheer. Finally, I did one more coat, for a total of 4 coats! And it was opaque all right.

The only problem was that this polish air bubbled up on me like crazy. You may not notice it in the picture above but it bubbled! I don't know what went wrong...I probably added too many coats. I guess next time I will just have to settle on sheer looking nails and stick to 2-3 coats. But pretty color nonetheless.

How is your Saturday going? Hope you all are enjoying yourselves! Here is to a great weekend (raises cup)


Disclosure: I purchased this polish on my own at my local Target store

Thursday, November 12, 2009

MAC Holiday Collection-Mischief Makers: 5 Cool Capers Mini Pigment/Glitter and Swatches!

MAC really did it up with their new holiday collection. I love all that was out, but I ended up getting one item which was the cool capers that contained 5 mini sizes of pigments. There were 2 other pigment/glitter sets, but I think the colors from the other 2 were a bit similar and consisted of mostly golds and bronzes. I decided on this pigment and glitter set because the colors looked very diverse and would be so much fun to try out and create looks with them. I will definitely create looks with these pigments so look out for that!


I know this may be a shock to some of you but...this was my very first time trying out MAC pigments! I have never tried them because they are a little expensive-$20.00 a pop! But you do get a lot of product for what you pay for and I am definitely going to be on the look out for pigments and glitters in the future. I thought this set was a great way to try them for a reasonable price ($32.50 each set) and each set comes with 5 pigments/glitters. Not bad eh?

These would totally make wonderful christmas gifts for your loved ones out there who love MAC and love makeup! I love it!

Colors in the Cool Capers Kit:
1. Grape Pigment-Shimmery deep purple
2. Fuchsia Pigment-Shimmery medium pink
3. Deep Blue Green Pigment-Dark shimmery teal/black (great for a smokey eye!)
4. Reflects Transparent teal Glitter-Shimmery white/clear with turquoise shimmer
5. Kitschmas Pigment-Light shimmery lilac/lavender

Here are swatches that I did on my eye of each pigment/glitter color. For each swatch, I primed my eyes with Urban Decay Primer Potion and I applied these eye colors wet using MAC's Fix +. I loved how easy it was to apply each of these shadows and they looked really good on their own. You can even layer pigments over other eyeshadow colors to really make them pop!


Grape Pigment


Fuchsia Pigment


Deep Blue Green Pigment


Reflects Transparent Teal


Kitschmas Pigment


I really love all the colors. The one that I find most interesting is the Glitter in Reflects Transparent Teal. I think this one is best when it is layered over another eyeshadow to give it a pop of glitter! I also like the fact that this glitter has sort of a reflect of teal when you turn at certain angles. Very pretty!

I also had a bit of a problem applying Kitschmas pigment. I had major fallout! But it's nothing I can't handle :) I love it anyways, very pretty!

Overall, I really enjoyed this set and I might just look out for more MAC holiday items. Have any of you tried this set? Have any of you tried these pigments/glitter? Let me know in the comments section loves!


Disclosure: I purchased this set from a MAC store.

ShareThis